5 March 2015

Mitred Granny Square Pattern first published here in 2013

This is a pattern that I came up with in around 2013 for a granny square with a difference.  I have gotten a bit bored with the look of the granny but wanted to make a blanket that was easy to make while watching TV or chatting with a modern twist to the traditional design.  With some trial and error the Mitre Granny Square came about.

It has been a firm favourite on this blog since I first published it here February 2013, so if you missed it first time round, here it is again to enjoy.

Have fun.


21 February 2015

Spring - Sheep Cross Stitch Chart - NEW!

As it's officially Spring I decided to re-release and update a design of mine that was published in Cross Stitcher magazine 10 years ago.

Enjoy stitching and don't feel bound by my colour selections, you can use whatever floss and aida/evenweave fabric you have available in your stash.


16 February 2015

Cross Stitching - Green Goddess

I've been having a little break from crochet and knitting since completing a single bed crochet blanket and a jumper for hubby in November.  I have been enjoying myself working on the Green Goddess designed by Joan Elliott.  I'm almost finished but here is a look back over my progress during the last few months.


3 January 2015

Vanessa Cabban

It was with a heavy heart that I learned of the tragic death of Vanessa Cabban, a most talented and creative spirit whose blog I enjoyed reading so very often.  Though I never met her I feel her loss as a treasured kindred spirit in knitting, crochet and other crafty persuits. Rest in Peace Vanessa.

14 July 2014

Changes


I've spent most of today changing a few things on the blog for a more uncluttered style.  I hope you enjoy the changes and feel things are a bit easier to find.  I will be continuing to add and move things about over the next few days so forgive any mini glitches.


19 April 2014

Happy Easter - Free Bunny Cross Stitch Chart


5 x 7 Inches on 14 count aida or 28 count evenweave.

This chart is ideal for a beginner.  To add further detail and texture you could embroider daisies or add flower shaped buttons, bee, butterfly or bird charms.

6 December 2013

Rest in Peace Madiba


Nelson Rolihlahla Mandela  1918-2013

"I have fought against white domination and I have fought against black domination.  I have cherished the ideal of a democratic and free society in which all persons will live together in harmony with equal opportunities.  It is an ideal which I hope to live for and to see realised.  But my Lord, if needs be, it is an ideal for which I am prepared to die."

16 February 2013

Mitred Granny Square Blanket

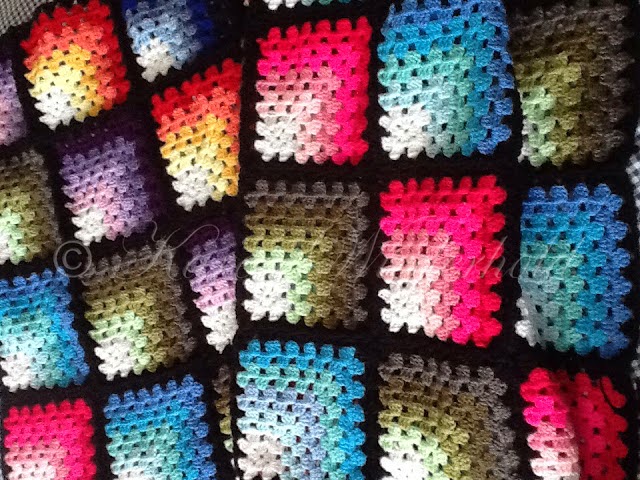
The pattern for the Mitred Granny Square (Optical Illusion Blanket) which used to appear in this post has moved to my website as is still free to download.  Click the image above to be taken to it.

Thanks for visiting,

K x


5 February 2013

Wreath for Valentine's Day - Free Project


A wreath is not just for the December/Winter festive season, they can be for any time of year or festivity and i'm a big fan of bringing the season or festivity into my home with a wreath hanging on either a door or in the window.  So here we have a beaded and bejewelled wreath for Valentine's day, but it can be hung all year in your bedroom for that touch of femininity and romance.


You will need,
Small willow wreath
Transparent, hollow plastic heart
Feathers
Spool of silver jewellery wire
Assortment of clear and pearlescent beads
1 metre fuchsia chiffon ribbon
White satin cord/piping/ribbon


To make,
1. Tie length of satin cord through the top of the wreath for hanging.  

2. Thread all the beads on to the silver wire, keeping the wire attached the  spool
     to prevent the beads sliding off.  Then securing the end of wire around a twig with a 
     few twists, begin to wind the beaded strand around the wreath as many times as you 
     choose, feeding beads along the wire a few at a time and unwinding the spool as you go. 
     Make sure you disperse the beads evenly around the wreath during winding.  Once you 
     have finished winding, snip wire from spool, pouring left over beads on the wire into a 
     container.

3. Fill the hollow heart with the feathers and close.  Thread a length of ribbon through the loop
     in the top then through the centre of the wreath, tying in a bow around the cord to secure.

4. Tie sections of ribbon round the wreath and trim ends.


26 January 2013

Free Project: Valentine's Day Card


Fancy making a card for your love?  


1 white card blank
4” x 3.5” piece purple cardstock 
4” x 1” piece hot pink  cardstock
3 pink mini brads
4” length pearl strand
5” length fuchsia chiffon ribbon
4” length ivory lace
Translucent Fimo,  number 014

To make the heart:  Take a thumb sized piece of fimo and warm between your palms for pliability.     Roll into a ball, then on a flat surface roll into a sausage measuring 10” in length.  Cut in half, lie side by side and then twist one pair of  ends around each other.  Bend the sections into heart shape and then twist the remaining pair of ends around each other.  Bake as per packaging instructions.
Mount three brads in a even spaced line down the left hand edge of the purple piece.  Glue this to the front of the card.

Adhere the pink piece along the bottom edge of the purple piece, then cover the join of these two pieces with the lace.

Using wet glue dots, attach the pearl strand across the lace.

Tie a ribbon around the heart and glue this to the card with super glue.


© Karen Wiederhold

3 December 2012

It's Gingerbread Time! Free Cross Stitch Chart - Gingerbread Man.


Here he is again, making another appearance for the festive season.  He really is so cute it's hard not to let him out and about each December.

Enjoy x


26 June 2012

Let's Get Crafting New Issue

Out now and you'll find my pattern for a crochet placemat inside.


22 April 2012

11 April 2012

I'm on the cover.

My Jubilee Cushion design is on the cover of Let's Get Crafting Knit and Crochet Issue 40 out now.  So excited about it being showcased as the the main cover photograph.   I really enjoyed creating the knitting pattern and chart for the cushion and hope lots of knitters have fun making it.

17 March 2012

Snazzy Circle Squares Cushion Reveal

The Snazzy Circle cushion i've been working on is finished.  You can read up about it's progress and pattern here.

29 February 2012

Snazzy Circle Squares


Patons UK Smoothie DK yarn and 3.5mm hook.

Round1.    
Ch5, join to form ring.

Round 2.  
Ch3 (this forms first Tr), Tr11 into ring, join to first Tr with SS to close round.  (12 Tr's)

Round 3.  
Join new yarn into a space between Tr's.  Ch3 (this forms first Tr)  Tr1 into same space, Tr2 into each space,  join to first Tr with SS to close round. (12 clusters)

Round 4.
Join new yarn into a space between clusters.
Ch3 (this forms first Tr)  Tr2 into same space, *Ch1, Tr3 into next space* repeat * to * to end.   Join to first Tr with SS to close round. (12 clusters)

Round 5.
Join new yarn into a space between clusters.
Ch4 (this forms DTr) Tr2 into same space, *Ch1, Tr3 into next space, Ch1, Tr3 into next space, Ch1,  Tr2 and DTr1into next space Ch2 then into this same space DTR1 and Tr2 to form a corner* now repeat * to* to end, join to first Tr with SS to close round.

I joined the motifs together by working single crochet on the outward facing edges to form a defined border between each square.

First I joined five squares together at a time, then when I had five strips, I joined these together.  The finishing edge around the whole piece is worked in double crochet stitches.

To make a cushion: Make two pieces as shown in the photo above, or make one piece as shown above and a second one as a single large Granny Square.

Place the pieces together with the right sides facing out and crochet three of the sides together using Double Crochet stitches.  Place the cushion pad inside and crochet the final side together.


Designed by Karen Wiederhold  © 2000 - 2020   All rights reserved.

Personal use only.  Please do not sell or reproduce this pattern or use it for a paid class you may be teaching.  If you wish to use it as a group project, please contact me in advance.  Please remember to credit me if you make this project by linking my Instagram, Facebook Page or Blog on your social media posts or Pinterest etc.


27 January 2012

Let's Get Crafting Issue 38

The new issue of Let's Get Crafting is on sale now with patterns for things to make for Baby.   I have three projects inside and here is a glimpse of one of them with permission of the magazine.  Let's Get Crafting comes with a complete kit of yarn, crochet hook and knitting needles to get started so it's great for a beginner or someone wanting to rediscover a hobby they've gotten out of touch with.


Edited to add:  I had a request from a reader for help with assembling the booties on page 56, so i've drawn a quick sketch.  Not the most fabulous of sketches but it shows the important stuff :-)  If you also need some help please email me and i'll get it to you.  My email address can be found in the "about me" section at the top of the blog.


25 January 2012

Valentine's Day Card


1 white card blank
4” x 3.5” piece purple cardstock 
4” x 1” piece hot pink  cardstock
3 pink mini brads
4” length pearl strand
5” length fuchsia chiffon ribbon
4” length ivory lace
Translucent Fimo,  number 014

To make the heart:  Take a thumb sized piece of fimo and warm between your palms for pliability.     Roll into a ball, then on a flat surface roll into a sausage measuring 10” in length.  Cut in half, lie side by side and then twist one pair of  ends around each other.  Bend the sections into heart shape and then twist the remaining pair of ends around each other.  Bake as per packaging instructions.
Mount three brads in a even spaced line down the left hand edge of the purple piece.  Glue this to the front of the card.


Adhere the pink piece along the bottom edge of the purple piece, then cover the join of these two pieces with the lace.

Using wet glue dots, attach the pearl strand across the lace.

Tie a ribbon around the heart and glue this to the card with super glue.


© Karen Wiederhold


12 January 2012

Floral Garland heads-up.

One of the things I wanted to share with you for a little while now is my Flower Garland which you will find over on the Let's Get Crafting website as a free pattern once you've logged in and there are more patterns available in the recent issue on sale.


Have a great, colourful day.

30 November 2011

DIY

Things on the craft front have been in rest mode the last few days because I've been gripped by DIY fever. There has been a slow and steady accumulation of little jobs on my DIY to do list, things like glossing, touching up, outdoor painting and curtain adjustments (you mean safety pins discretely holding up the hems for a few months isn't in vogue any more hee hee).

One job on my list was a biggie, one that I've never attempted before..........wallpapering. It started quite a few months back where every time I passed the large wall on my stairs it's blankness looked quite lonely and in need of something. I've never grown up with wallpaper being a decorating norm, South African homes aren't papered much if at all, but living in England i've admired lots of wallpapered rooms and also oohed and aahed at copious amounts of glimpses on house related tv shows. I'm not brave enough to paper an entire room because I feel more comfortable with unpatterned walls around me at home........ then I see other people's rooms where all walls are papered and I love it......still not brave enough yet. So on Sunday we took the plunge and purchased the first wallpaper in ten years for the stairs wall and Monday I papered. We all love it and I'm pleased with my efforts. I did opt for Paste the Wall paper because the thought of getting to grips papering and dealing with wet paper at the same time filled me with the jitters. It was like scrapbooking on a grand scale......well that was what I kept telling myself, if I can negotiate detailed paper cutting mini size then this would be okay right?

Yesterday I touched up a bedroom wall section while catching up on the phone to my friend Ruth, company when working is always good. Today's job is the curtain hem take-up and some mending while the machine is out. And while it's out I may also make a bag....will see.

9 October 2011

Making Risotto

This afternoon I could not stop thinking about having Risotto for dinner, just love everything about it and especially enjoy making it too.

It's often heard said that it's tricky to make and all that but it's not; it just takes a little time and if you get all you ingredients ready then there's no need to worry.

I like cooking Risotto on the weekend and accompany this time with either Alan Carr or Paul O'Grady to chuckle along to while stirring.

The basic ingredients are Risotto rice, butter, olive oil, crisp white wine, chicken stock, garlic, Parmesan then what ever other ingredients are fancied at the time to add. Tonight it was chicken, onions and sun dried tomato.

Cook onions until clear in hot oil and butter, then add rice and stir.  Cook until the tips of the rice grains turn clear.


Add about 200ml wine.  Add garlic. Keep stirring gently.

Make 1 litre stock.  Add stock, a little at a time and keep stirring.  As soon as it gets a bit sticky, add a bit more stock.

Add your other ingredients, keep stirring gently and carry on adding stock until the rice is cooked then allow the risotto to become creamy.  If you have any stock left, pour into an ice cube tray and freeze for making gravy or adding to something tasty.


Grate enough Parmesan to fill about three quarters of a cup. Add to the Risotto with some black ground pepper and good pinch of salt, stir in gently and serve, eating straight away.


 Enjoy x


PS  I added some chestnut mushrooms which i'd cooked separately in butter after serving, to spare those who don't like mushrooms.  I forked them through before eating.

30 September 2011

Let's Get Crafting Christmas Monsters

Hello there.  At last this new issue of the magazine is out and I can finally share these quirky little guys with you.  You will find the pattern to make my little monsters in Let's Get Crafting Issue 35 on Sale from today.